Overview
Looking for a free LVGL events template or an example of how to wire embedded UI interactions without hand-writing every callback? This PicoPixel project shows a compact 480 x 480 screen with buttons connected to visible actions through the PicoPixel event editor.
The template is built as a practical LVGL interaction reference. It demonstrates how a button click can update another object, change opacity, modify text, resize a target, and play an animation. Use it as a starting point for touch-driven ESP32 dashboards, kiosk screens, smart-home controls, wearable menus, settings panels, or any LVGL UI where the user needs immediate feedback after pressing a button.
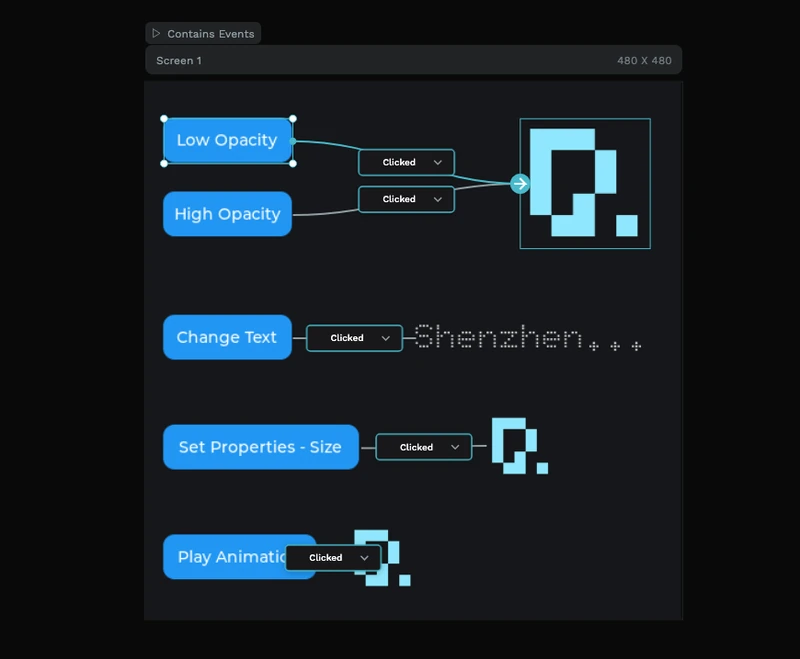
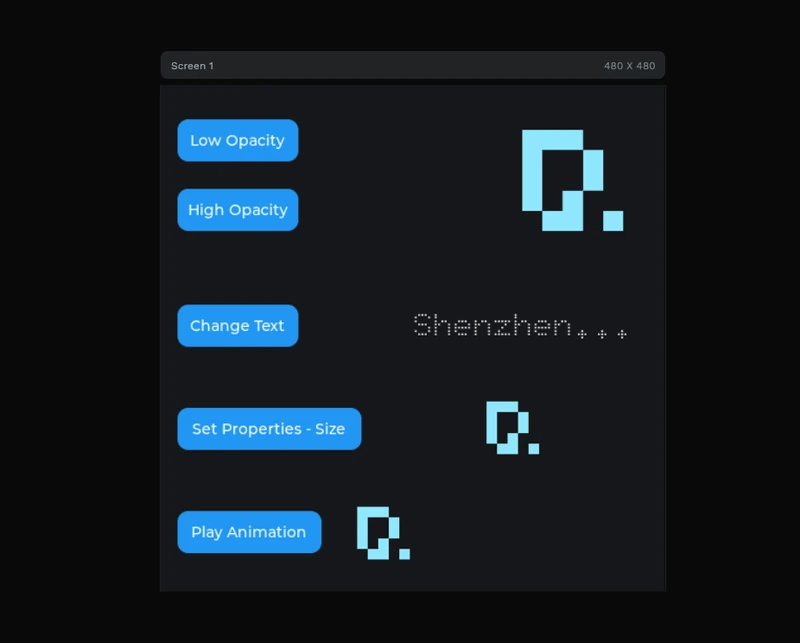
The normal canvas preview shows the interface itself. The events view shows the wiring: buttons on the left, targets on the right, connector lines between them, and the event inspector panel where the source, trigger, action, value, and destination are configured.
What's included
- 480 x 480 LVGL interaction screen, sized for embedded displays and quick experiments.
- Five button examples, each showing a different kind of UI response.
- Opacity controls, with
Low OpacityandHigh Opacitybuttons connected to the same image target. - Text update example, using the
Change Textbutton to modify a label. - Property change example, using
Set Properties - Sizeto change a target object's size. - Animation trigger, using
Play Animationto demonstrate an event-driven motion or transition. - Event editor wiring preview, with visible connector lines and
Clickedtrigger nodes. - Inspector-side action settings, showing source, trigger, action, opacity value, and destination fields.
- Image targets, using a simple cyan PicoPixel-style graphic so state changes are easy to see.
- Doto 32 font asset, used for the dotted display text on the canvas.
Asset snapshot
The template stays small enough to understand at a glance. In the assets panel, the local library shows:
- Images:
1, a reusable 500 x 500 cyan graphic used by the image targets. - Colors:
0, with colors applied directly in the design. - Fonts:
1,Doto 32, used for the dotted label text. - Widgets:
0, keeping the example focused on screen-level event wiring rather than saved widget assets.
The layer panel shows the project as a simple one-screen interaction lab:
-
Screen 1, the 480 x 480 canvas. -
Button 1throughButton 5, the clickable sources for the examples. -
Image 1,Image 2, andImage 3, the visible targets for opacity, size, and animation changes. -
Label 1, the text target used by the change-text example.
This makes it useful for learning because every source and destination is visible in the same screen.
Event editor structure
When the events view is active, PicoPixel overlays the interaction graph on top of the LVGL layout. The screenshot shows the project marked with Contains Events, then draws connector lines from the button sources to their destinations.
-
Low OpacityandHigh Opacityboth use aClickedtrigger and route into the same image target. -
Change Textuses aClickedtrigger and points to the dotted text label. -
Set Properties - Sizeuses aClickedtrigger and points to an image target for resizing. -
Play Animationuses aClickedtrigger and points to an image target for animation playback. - The right-side events panel shows one selected event with
Source,Trigger,Action, value settings such asOpacity, andDestination.
That layout is the main teaching value of this template: it shows how PicoPixel's visual event graph maps user input to LVGL object changes without hiding the relationship between the trigger and the target.
Before exporting, rename the important objects in PicoPixel, for example btn_low_opacity, btn_high_opacity, btn_change_text, btn_set_size, btn_play_animation, target_image, and status_label. Clear names make the exported LVGL event callbacks much easier to scan.
Why this works well for LVGL
LVGL applications usually need a lot of small interactions: click a button, update a label, change an object's state, move an image, switch screens, or start an animation. This example keeps those patterns visible and reusable.
- Buttons are native LVGL input objects, so the same pattern works with touch, encoder focus, or other input drivers.
- The trigger is explicit, using
Clickednodes in the editor so it is clear what starts each action. - Targets are normal LVGL objects, including images and labels, so the exported UI remains editable from firmware.
- Opacity and property changes are lightweight, making the examples suitable for small embedded displays.
- Animation wiring teaches the handoff, from a user event to a visual change that can run independently.
- The project exports as standard LVGL 8.x UI code, so it can be integrated into ESP-IDF, Arduino, PlatformIO, STM32, Zephyr, or another LVGL build.
Runtime pattern
PicoPixel can generate the event wiring for you, but the concept maps directly to normal LVGL callbacks. If you need to extend the exported UI with custom firmware logic, the pattern is usually: check the event code, then update the target object.
static void low_opacity_clicked_cb(lv_event_t * e)
{
    if (lv_event_get_code(e) != LV_EVENT_CLICKED) return;

    lv_obj_set_style_opa(ui_target_image, LV_OPA_30, 0);
}

static void change_text_clicked_cb(lv_event_t * e)
{
    if (lv_event_get_code(e) != LV_EVENT_CLICKED) return;

    lv_label_set_text(ui_status_label, "Clicked");
}
Use the visual editor for the common wiring, then reserve custom C callbacks for behavior that depends on firmware state, sensor data, device settings, or network responses.
Customization ideas
Use this as a free LVGL interaction template, then swap the demo controls for your own product UI.
- Replace the five demo buttons with settings toggles, menu items, dashboard controls, or hardware commands.
- Change the opacity actions into disabled/enabled states, warning states, or selected/unselected states.
- Use the text action for status messages like
Connected,Saving,Armed,Charging, orComplete. - Turn the size property example into a progress indicator, expanded card, pressed-state effect, or notification pulse.
- Use the animation example for page transitions, confirmation feedback, loading states, or attention cues.
- Add navigation actions between multiple LVGL screens once the single-screen examples make sense.
- Pair the buttons with real firmware events, such as changing brightness, toggling a relay, selecting a mode, or starting a calibration flow.
Exporting to your project
Open the template in PicoPixel, inspect the event graph, rename the key sources and targets, then export the project as LVGL C code. The generated files can be added to an existing embedded project like any other PicoPixel export.
For ESP32 projects, the usual flow is:
- Configure your display and input drivers.
- Open this events template and adapt the buttons, labels, images, and actions.
- Export the PicoPixel UI as LVGL C.
- Add the exported files to your ESP-IDF, Arduino, or PlatformIO project.
- Call
ui_init()after LVGL and your display driver are ready. - Add custom firmware callbacks only where the visual event editor is not enough.
For more background, see the PicoPixel event editor guide, the ESP32 LVGL UI tutorial, and the guide on using PicoPixel templates.
Best uses
This template is a good fit when you want a clear starting point for:
- LVGL event examples
- Button-click interaction demos
- ESP32 touch UI prototypes
- Settings screens and control panels
- Smart-home dashboards
- Wearable or handheld menus
- Animation-trigger examples
- Text and image state changes
- Learning how PicoPixel visual events become LVGL behavior