ओवरव्यू
क्या आप मुफ्त LVGL events template या embedded UI interactions को हर callback हाथ से लिखे बिना wire करने का example ढूंढ रहे हैं? यह PicoPixel project buttons को PicoPixel event editor के जरिए visible actions से connect करके compact 480 x 480 screen दिखाता है।
Template practical LVGL interaction reference की तरह बनाया गया है। यह दिखाता है कि button click दूसरे object को update कर सकता है, opacity बदल सकता है, text modify कर सकता है, target resize कर सकता है, और animation play कर सकता है। इसे touch-driven ESP32 dashboards, kiosk screens, smart-home controls, wearable menus, settings panels, या किसी भी LVGL UI के starting point की तरह इस्तेमाल करें जहाँ user को button press के बाद immediate feedback चाहिए।
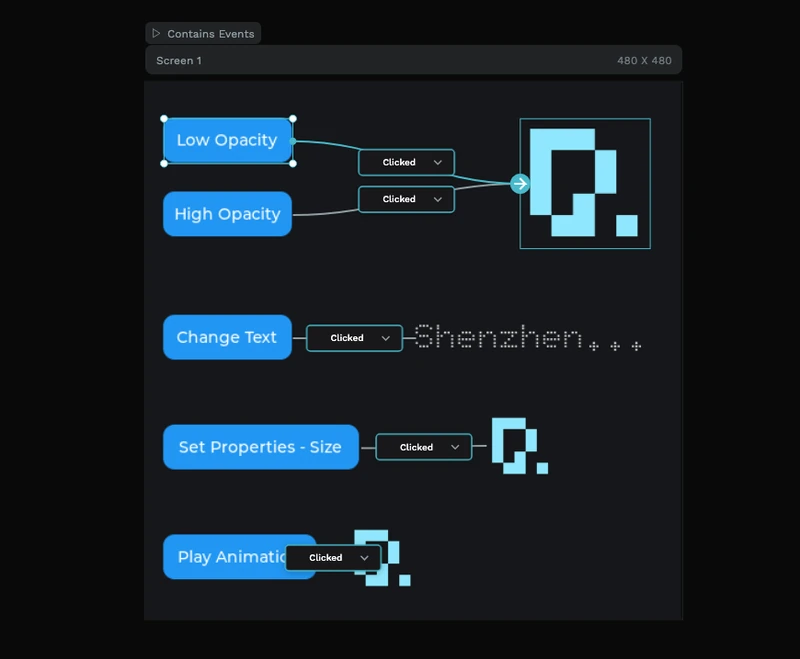
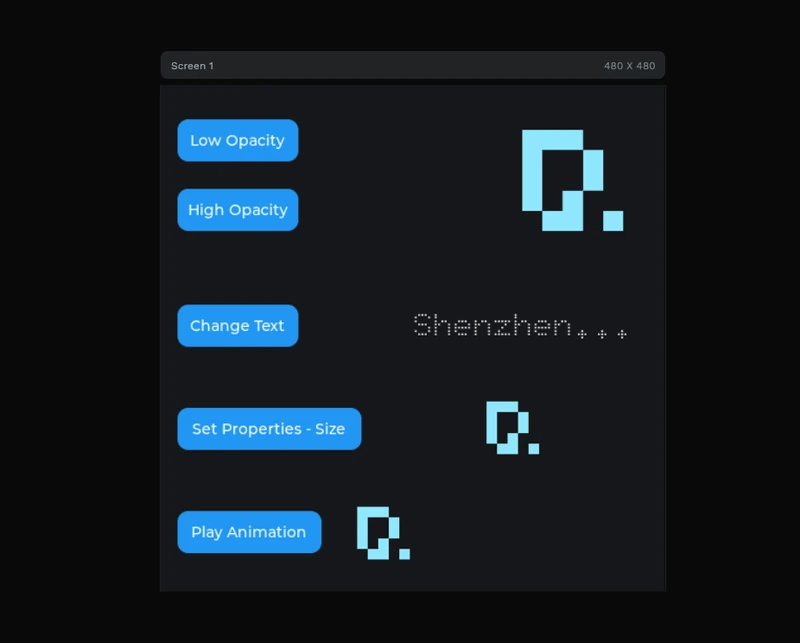
Normal canvas preview interface खुद दिखाता है। Events view wiring दिखाता है: left पर buttons, right पर targets, उनके बीच connector lines, और event inspector panel जहाँ source, trigger, action, value और destination configure होते हैं।
क्या शामिल है
- 480 x 480 LVGL interaction screen, embedded displays और quick experiments के लिए sized।
- Five button examples, हर एक अलग तरह का UI response दिखाता है।
- Opacity controls, जिनमें
Low OpacityऔरHigh Opacitybuttons same image target से connected हैं। - Text update example, जिसमें
Change Textbutton label modify करता है। - Property change example, जिसमें
Set Properties - Sizetarget object's size बदलता है। - Animation trigger, जिसमें
Play Animationevent-driven motion या transition demonstrate करता है। - Event editor wiring preview, visible connector lines और
Clickedtrigger nodes के साथ। - Inspector-side action settings, source, trigger, action, opacity value और destination fields दिखाते हुए।
- Image targets, simple cyan PicoPixel-style graphic के साथ ताकि state changes देखना आसान हो।
- Doto 32 font asset, canvas पर dotted display text के लिए इस्तेमाल किया गया है।
एसेट झलक
Template इतना छोटा रहता है कि उसे एक नजर में समझा जा सके। Assets panel में local library दिखाती है:
- Images:
1, reusable 500 x 500 cyan graphic जो image targets में इस्तेमाल होता है। - Colors:
0, colors design में directly apply हैं। - Fonts:
1,Doto 32, dotted label text के लिए। - Widgets:
0, जिससे example saved widget assets के बजाय screen-level event wiring पर focused रहता है।
Layer panel project को simple one-screen interaction lab की तरह दिखाता है:
-
Screen 1, 480 x 480 canvas। -
Button 1सेButton 5, examples के clickable sources। -
Image 1,Image 2औरImage 3, opacity, size और animation changes के visible targets। -
Label 1, change-text example में इस्तेमाल text target।
यह learning के लिए useful है क्योंकि हर source और destination same screen में visible है।
इवेंट एडिटर संरचना
जब events view active होता है, PicoPixel LVGL layout के ऊपर interaction graph overlay करता है। Screenshot project को Contains Events के साथ marked दिखाता है, फिर button sources से destinations तक connector lines draw करता है।
-
Low OpacityऔरHigh OpacityदोनोंClickedtrigger use करते हैं और same image target में route होते हैं। -
Change TextClickedtrigger use करता है और dotted text label की ओर point करता है। -
Set Properties - SizeClickedtrigger use करता है और resizing के लिए image target की ओर point करता है। -
Play AnimationClickedtrigger use करता है और animation playback के लिए image target की ओर point करता है। - Right-side events panel एक selected event दिखाता है जिसमें
Source,Trigger,Action,Opacityजैसे value settings औरDestinationहैं।
यही layout इस template का मुख्य teaching value है: यह दिखाता है कि PicoPixel का visual event graph user input को LVGL object changes से कैसे map करता है, बिना trigger और target के relationship को hide किए।
Export करने से पहले PicoPixel में important objects rename करें, जैसे btn_low_opacity, btn_high_opacity, btn_change_text, btn_set_size, btn_play_animation, target_image और status_label। Clear names exported LVGL event callbacks को scan करना बहुत आसान बनाते हैं।
यह LVGL के लिए क्यों अच्छा है
LVGL applications को आम तौर पर कई छोटे interactions चाहिए होते हैं: button click करना, label update करना, object state बदलना, image move करना, screens switch करना, या animation start करना। यह example उन patterns को visible और reusable रखता है।
- Buttons native LVGL input objects हैं, इसलिए same pattern touch, encoder focus या दूसरे input drivers के साथ काम करता है।
- Trigger explicit है, editor में
Clickednodes use होते हैं ताकि साफ रहे कि हर action क्या start करता है। - Targets normal LVGL objects हैं, जिनमें images और labels शामिल हैं, इसलिए exported UI firmware से editable रहती है।
- Opacity और property changes lightweight हैं, जिससे examples small embedded displays के लिए suitable हैं।
- Animation wiring handoff सिखाती है, user event से visual change तक, जो independently run हो सकता है।
- Project standard LVGL 8.x UI code के रूप में export होता है, इसलिए इसे ESP-IDF, Arduino, PlatformIO, STM32, Zephyr या किसी दूसरे LVGL build में integrate किया जा सकता है।
रनटाइम पैटर्न
PicoPixel आपके लिए event wiring generate कर सकता है, लेकिन concept normal LVGL callbacks से directly map होता है। अगर आपको custom firmware logic के साथ exported UI extend करनी हो, तो pattern आम तौर पर यह है: event code check करें, फिर target object update करें।
static void low_opacity_clicked_cb(lv_event_t * e)
{
    if (lv_event_get_code(e) != LV_EVENT_CLICKED) return;

    lv_obj_set_style_opa(ui_target_image, LV_OPA_30, 0);
}

static void change_text_clicked_cb(lv_event_t * e)
{
    if (lv_event_get_code(e) != LV_EVENT_CLICKED) return;

    lv_label_set_text(ui_status_label, "Clicked");
}
Common wiring के लिए visual editor इस्तेमाल करें, फिर custom C callbacks केवल उस behavior के लिए रखें जो firmware state, sensor data, device settings या network responses पर depend करता है।
कस्टमाइज़ेशन विचार
इसे मुफ्त LVGL interaction template की तरह इस्तेमाल करें, फिर demo controls को अपनी product UI से swap करें।
- Five demo buttons को settings toggles, menu items, dashboard controls या hardware commands से replace करें।
- Opacity actions को disabled/enabled states, warning states या selected/unselected states में बदलें।
- Text action को
Connected,Saving,Armed,ChargingयाCompleteजैसे status messages के लिए इस्तेमाल करें। - Size property example को progress indicator, expanded card, pressed-state effect या notification pulse में बदलें।
- Animation example को page transitions, confirmation feedback, loading states या attention cues के लिए इस्तेमाल करें।
- Single-screen examples समझ में आने के बाद multiple LVGL screens के बीच navigation actions add करें।
- Buttons को real firmware events से pair करें, जैसे brightness बदलना, relay toggle करना, mode select करना, या calibration flow start करना।
अपने प्रोजेक्ट में एक्सपोर्ट करना
Template को PicoPixel में खोलें, event graph inspect करें, key sources और targets rename करें, फिर project को LVGL C code के रूप में export करें। Generated files को किसी भी दूसरे PicoPixel export की तरह existing embedded project में add किया जा सकता है।
ESP32 projects के लिए usual flow है:
- अपने display और input drivers configure करें।
- इस events template को खोलें और buttons, labels, images और actions adapt करें।
- PicoPixel UI को LVGL C के रूप में export करें।
- Exported files को अपने ESP-IDF, Arduino या PlatformIO project में add करें।
- LVGL और display driver ready होने के बाद
ui_init()call करें। - Custom firmware callbacks केवल वहाँ add करें जहाँ visual event editor enough नहीं है।
ज्यादा background के लिए PicoPixel event editor guide, ESP32 LVGL UI tutorial, और using PicoPixel templates guide देखें।
सबसे अच्छे उपयोग
यह template तब अच्छा fit है जब आप इनके लिए clear starting point चाहते हैं:
- LVGL event examples
- Button-click interaction demos
- ESP32 touch UI prototypes
- Settings screens और control panels
- Smart-home dashboards
- Wearable या handheld menus
- Animation-trigger examples
- Text और image state changes
- यह सीखना कि PicoPixel visual events कैसे LVGL behavior बनते हैं