What is PicoPixel LVGL MCP?
PicoPixel LVGL MCP is a hosted Model Context Protocol server for creating and editing LVGL user interfaces with AI assistants. It connects clients such as Claude, ChatGPT, Codex, and Cursor to the LVGL project you have open in PicoPixel. You describe the interface or change you want, and the assistant can inspect your actual screens, discover available widgets and assets, and apply changes to the design. The result is an editable PicoPixel project that you can continue working on yourself.
MCP stands for Model Context Protocol, an open standard that lets AI applications use tools and read information from other systems. The assistant is the MCP client; PicoPixel provides the MCP server and its design tools. You can read more about the standard in the official MCP introduction.
For example, you can ask your assistant to create a dashboard for a 480 × 320 display, arrange a group of controls, reuse a status-card component, import an icon, generate a font, or build light and dark color themes. It works with native LVGL screens and widgets, so the output stays available for visual editing and LVGL export.
This LVGL MCP setup guide covers connecting your assistant, choosing read or write access, configuring components and colors, and building your first screen. You connect to a server that PicoPixel already runs; you do not need to clone a repository, install a local server, or run Docker to use it.
See the prompt behind this health dashboard and explore more demonstrations on the PicoPixel LVGL MCP server page.
How the LVGL MCP server works
There are three parts to a working session:
- Your AI assistant interprets your request and chooses which PicoPixel tools to call.
- The hosted MCP server authenticates the connection and passes supported requests to the editor.
- Your open PicoPixel tab supplies the active document, applies permitted changes, and displays the result on the canvas.
The client connects to the hosted service over Streamable HTTP. If a setup form asks for a transport, choose Streamable HTTP or the client's equivalent remote HTTP option. The editor maintains its own connection to the service while you work.
Keep the intended project open in a signed-in PicoPixel browser tab throughout the session. Being able to list the server's tools does not by itself mean the editor is connected: the assistant also needs a responsive tab with a ready document.
Only one PicoPixel tab owns the browser connection at a time. Multiple AI clients can connect, but they share the active document and your account's MCP allowance. Give each client a clear task and let one finish its edits before another changes the same screen.
Before asking for a design change, ask the assistant to identify the active file and screen. This is especially useful after opening another project or reconnecting a client.
Before you start
Have the following ready:
- A PicoPixel account with MCP access. Open account Integrations to check your access. If the controls are unavailable, follow the access message shown there. Plan allowances are listed on the pricing page.
- An MCP-capable assistant. Use a client that supports remote MCP connections and the authentication method you choose. Its own account or workspace settings may control whether custom connections are available.
- An open LVGL project. Use an existing file, create a new project, or start from a template. Choose the screen resolution for your intended display.
- Edit permission if you want changes. Reading and creating are separate capabilities. Your account must be able to edit the active file, and PicoPixel must have write access enabled for the agent.
For a first session, use a small project with a clearly named screen. You do not need to connect physical hardware to build and inspect the design in the editor.
Step 1: enable PicoPixel LVGL MCP in Integrations
Open PicoPixel Settings → Integrations. The MCP Server card contains the connection controls for your account.
- Check that MCP access is available for your account.
- Turn Status on. If you do not have an active key, PicoPixel opens the key-generation dialog. You can also use Generate MCP key.
- Choose an expiration period and generate the key. The available choices are 30, 60, 90, or 190 days.
- Set Agent access to the mode you want: Read only for inspection or Guarded write for creating and editing.
- For a manually configured client, copy the MCP server URL with Copy endpoint. If your client uses JSON, expand MCP client JSON configuration and use Copy config.
After setup, return to the LVGL file and keep it open while using your assistant.
Read only
The assistant can inspect the active project and discover resources without changing the file. This is useful for understanding an unfamiliar design, reviewing widget structure, checking which fonts are available, or asking for a proposed layout before applying it.
For example: “Inspect this project and explain how the main screen is structured. Suggest improvements to spacing, but do not change anything.”
Guarded write
The assistant can inspect the file and apply supported, validated changes. Choose this mode when you want it to create screens, edit widgets, import supported resources, or apply styling.
Guarded write saves changes when the assistant calls the write tool. It is not a preview-only mode, and it does not mean that PicoPixel presents a separate approval dialog for every edit. Your AI client may have its own tool-approval controls in addition to PicoPixel's access setting.
If you want to review a proposal first, say so in your prompt and keep Read only selected until you are ready to allow changes. If Guarded write is not offered, check the availability shown in your PicoPixel installation.
Step 2: choose your LVGL MCP server URL
PicoPixel has a public connector address and a personal server URL. They serve different setup flows.
Public connector URL: sign in with PicoPixel
Use this address when your client or PicoPixel integration asks for the public connector URL and supports account authorization:
https://app.picopixel.io/mcpThe client starts an OAuth sign-in flow: you sign in to PicoPixel and authorize the connection. You do not need to paste your private MCP URL into this flow.
Personal MCP server URL: manual setup
Copy this from Settings → Integrations. Its shape is:
https://app.picopixel.io/mcp/stream?userToken=<YOUR_PRIVATE_TOKEN>The token in the URL identifies your connection. Copy the entire value from the editor, including /mcp/stream and the query string. Do not replace it with the public connector URL unless you are deliberately switching to an OAuth setup.
In the commands below, <server-url> means the complete personal URL copied from Integrations. Replace that placeholder, including the angle brackets, and keep the surrounding quotation marks.
Your personal MCP URL contains a credential. Keep it out of shared repositories, screenshots, support posts, and shared chat transcripts. Paste it into your client's private connection settings. If it is exposed, regenerate the key in PicoPixel and update the affected connections.
Step 3: connect your AI client to LVGL MCP
Choose the instructions for your client. You only need one working connection to begin. Client interfaces change, so each route includes the relevant official reference.
Claude setup: browser or desktop app
- Open Customize → Connectors in Claude.
- Select the + button, then Add custom connector.
- Name the connector PicoPixel and enter the public connector URL,
https://app.picopixel.io/mcp. - Complete the PicoPixel sign-in and authorization flow.
- Make the connector available in your conversation, return to your open PicoPixel file, and ask Claude to check the connection.
You can open the Claude connector setup dialog directly. See Claude's connector guide for account and workspace requirements.
Claude Code setup
With Claude Code installed, run this in your terminal after replacing <server-url> with your personal MCP server URL:
claude mcp add --transport http PicoPixel-LVGL "<server-url>"Check the connection from Claude Code with /mcp. Keep the PicoPixel file open, then ask Claude to inspect the active project.
This follows the remote HTTP setup in the Claude Code MCP documentation. The command registers the hosted connection; it does not start a local PicoPixel server.
Codex CLI setup
With Codex CLI installed, register the personal URL:
codex mcp add picopixel-lvgl --url "<server-url>"Run codex mcp list to inspect configured servers, or use /mcp inside Codex to view active connections. Then open your PicoPixel project and run the connection-check prompt in the next section.
Codex also supports Streamable HTTP configuration through config.toml. See the official Codex MCP documentation for configuration scope and OAuth options. A connection using your personal token URL does not require a separate OAuth login step.
Cursor setup
If PicoPixel is available in your Cursor marketplace, use that integration's installation and sign-in flow. You can also configure the remote server manually using Cursor's MCP JSON settings:
{
  "mcpServers": {
    "picopixel-lvgl": {
      "url": "<server-url>"
    }
  }
}
Replace <server-url> with the URL from PicoPixel Integrations. Add this entry to your existing configuration without removing other servers. Cursor supports both personal and project configuration; use a private configuration location for a URL containing your token.
Enable the server in Cursor, use an agent conversation with its tools available, and keep your PicoPixel file open. The Cursor MCP documentation explains its configuration locations and connection controls.
ChatGPT setup
If your ChatGPT Plugins directory offers PicoPixel, add it and complete the PicoPixel sign-in flow. Make the integration available to the conversation before asking it to work on your open file.
For accounts with custom MCP app support, OpenAI also documents a developer-mode route. Enable Developer mode in Settings → Security and login, open Plugins, and use the + button to create a developer-mode app for the remote server. Use the public connector URL, https://app.picopixel.io/mcp, with OAuth authentication, then complete authorization.
Use the official ChatGPT developer-mode guide for current eligibility and interface details. If the option is unavailable in your workspace, check its app controls or use another MCP client you already have access to.
OpenClaw setup
Register your personal URL with Streamable HTTP selected explicitly:
openclaw mcp add PicoPixel-LVGL --url "<server-url>" --transport streamable-httpYou can inspect the saved setup with openclaw mcp status --verbose. Follow the reload instructions for the OpenClaw runtime that will use the connection, then ask the agent to check the active PicoPixel file. See the OpenClaw MCP reference.
Hermes setup
Register your personal URL:
hermes mcp add PicoPixel-LVGL --url "<server-url>"Use hermes mcp list to view configured servers and hermes mcp test PicoPixel-LVGL to test the connection. Keep the editor file open when you begin the design task. See the Hermes CLI reference.
Other MCP clients
Look for Add MCP server, Remote server, Tools, or Integrations in your client's settings. Choose Streamable HTTP, give the connection a name, and paste your personal server URL. If it accepts a mcpServers JSON object, use Copy config in PicoPixel Integrations or the JSON shape shown above.
The JSON format is a common client convention, not a requirement of the MCP protocol. Use your client's documented schema if its fields differ. A client that supports only local command-based servers cannot use this hosted URL directly without additional client-side support.
Step 4: verify the active file
Once the client is connected, use a read-only first prompt:
Use PicoPixel LVGL MCP to check the connection. Tell me the active
file name, whether the document is ready, whether writing is
available, the screen names and sizes, and my Components and
Saved Colors preferences. Do not change anything yet.
The assistant should use connection status and read the actual project. Look for the expected file name, a ready document, and the correct screen dimensions. If you intend to create or edit, it should also confirm that writing is available.
Three status fields are particularly useful when diagnosing setup:
browser_connectedindicates whether an editor connection exists.document_readyindicates whether the connected editor is responsive and ready for document work.write_availableindicates whether the current connection permits writes.
If the assistant can explain MCP but cannot identify your file, the setup is not yet ready for design work. Return to the intended editor tab and check Status, the key, and Agent access in Integrations.
Configure PicoPixel LVGL MCP agent settings
Connection permissions live in account Integrations. Authoring preferences live inside the project. Open the file, click Project Settings in the editor's top bar, and select AI & MCP. Under AGENT SETTINGS, you will find Components and Saved Colors.
These settings are saved with the file. They tell agents whether reusable components and saved palette entries should be part of their authoring workflow. Your assistant can read the choices, but the MCP project-settings operation does not let it change them for you.
| Setting | Choice | How the agent should build |
|---|---|---|
| Components | Use | Prefer a suitable local component; create a reusable component when the requested structure warrants it. This is the default. |
| Components | Individual Layers | Build with ordinary widgets and layers instead of creating or instantiating linked components through MCP. |
| Saved Colors | Use | Prefer an exact suitable local solid color, or create a saved color for a reusable palette role. |
| Saved Colors | Inline Colors | Apply ordinary color values directly instead of creating or applying saved palette entries through MCP. This is the default. |
The controls are independent. You can use components with inline colors, individual layers with saved colors, both reusable options, or neither.
Changing a preference affects subsequent authoring. It does not detach existing components, rewrite all widget colors, remove assets, or automatically reorganize a design you have already built. After changing a setting, ask your assistant to reread the project preferences before continuing.
Components: Use or Individual Layers
Choose Use for repeated, meaningful structures
A component packages a reusable structure, such as a status card, a header, or a control group. Instances let you repeat that structure while maintaining the component relationship. This is useful when the same design appears across several screens.
With Components → Use, the agent should inspect the local component library first and reuse an exact, suitable component. If no suitable component exists and you have asked for a reusable structure, it can build a canonical widget tree, make it a component, and instantiate it for repeated uses.
For example:
Create three status cards for temperature, humidity, and air
quality. Read my component settings and existing local
components first. Reuse a suitable card component if one exists.
Otherwise, create one reusable card structure and use instances
for the three readings. Keep unrelated screens unchanged.
Use does not mean “turn everything into a component.” A one-off label or a unique screen arrangement can stay as ordinary widgets. The agent should also avoid selecting an unrelated component simply because its name sounds similar.
The MCP component operations work with the active file's supported local linked LVGL components. A component visible in a different library is not automatically a local component that the agent can instantiate. Use the editor's library workflow to make the intended component available when necessary. See the libraries and components guide.
Choose Individual Layers for independent structures
Use Components → Individual Layers when you want freely editable widget trees without creating linked component instances. This is useful for exploring a layout, building a unique screen, or keeping similar-looking controls independent.
For example:
Build three independent status cards as individual widgets.
Keep each card editable on its own. Use my current project
preferences and do not create linked components.
This setting is more than a suggestion: MCP rejects component creation and instantiation when the component policy is disabled. If a request needs components, change the preference yourself or ask the agent to keep the design as individual layers.
Colors: Inline Colors, saved colors, and themes
PicoPixel has three related color workflows. Choosing the right one makes future edits easier to predict.
Inline Colors: a value on the widget
An inline color is an ordinary value applied to a particular widget style, such as a button background or label text color. Use Saved Colors → Inline Colors for one-off styling and projects where you want colors to remain direct values.
For example: “Set this button's background to #2563EB and its text to white. Keep the change local to this button.”
You do not need a saved color or theme for every color adjustment. This is the default saved-color preference.
Saved Colors: reuse an exact palette value
Choose Saved Colors → Use when you want the agent to work from the active file's saved palette. The agent should look for an exact suitable solid color first. If you need a reusable role that does not exist, it can create one saved entry and use it consistently.
For example:
Use saved colors for this dashboard. Inspect the local palette
first and reuse exact matches. Use a reusable Accent color of
#2563EB for the primary controls and a Surface color of #111827
for the cards. Create only the missing palette entries.
The setting does not authorize approximations: an existing blue that is merely close to #2563EB is not an exact match. It also does not require the agent to save every one-off color it uses.
Applying a saved color through MCP copies its resolved color and opacity into the widget's LVGL style. It does not create a live theme-token binding. Do not assume that changing a saved palette entry later will automatically recolor every widget that previously used it. Ask the assistant to reapply a palette value where needed, or use theme tokens for properties that should resolve through a shared role.
MCP's saved-color application currently supports local solid colors. A gradient or image entry in the palette is not interchangeable with a supported solid LVGL color.
Themes: one role with different values across modes
Use themes when the interface needs modes such as Light and Dark, or a coordinated palette whose role names are shared across widgets. The widget uses a token name, and the active theme supplies the value for that name.
Themes require an explicit request. Saved Colors → Use does not turn on automatic theme creation, and asking for a dark background does not mean that the agent should create a theme.
The theme demo from our LVGL MCP showcase shows a racing dashboard changing from a dark palette with pink accents to a warm light palette with orange accents. The gauges and layout stay in place while their colors change.
For example:
Create Light and Dark color themes for this dashboard. Inspect
existing themes first. Use the same roles in both themes:
dashboard.background, dashboard.surface, dashboard.text, and
controls.accent. Bind the relevant widget colors to those roles.
Preserve the existing layout and reuse suitable themes or roles.
Dotted names such as dashboard.surface organize tokens into groups in the Themes tab. The full name must match across themes: dashboard.surface and dashboard.Surface are different roles.
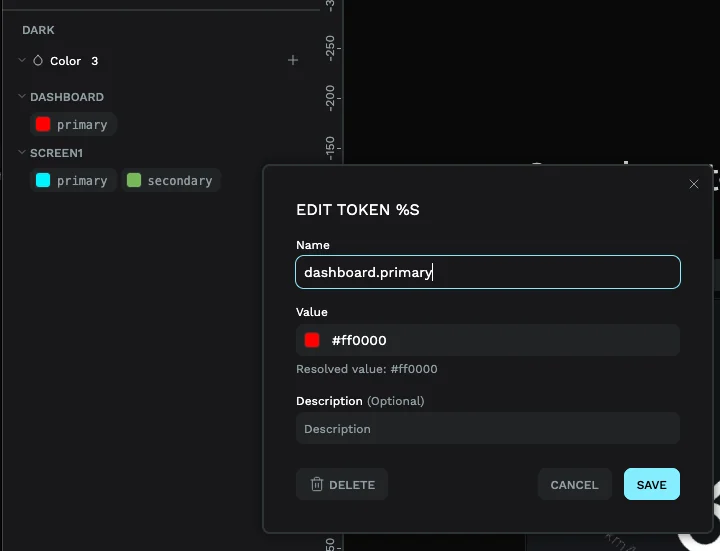
For the full visual workflow, including a runtime theme-switching event, see Creating LVGL themes.
Practical combinations
| Your goal | Components | Saved Colors | What to request |
|---|---|---|---|
| Explore a unique screen | Individual Layers | Inline Colors | Independent widgets and direct color values. |
| Repeat a card with fixed styling | Use | Inline Colors | A reusable component with ordinary widget colors. |
| Keep independent screens on a common palette | Individual Layers | Use | Exact palette reuse without linked components. |
| Build a reusable set of controls | Use | Use | Suitable local components and reusable solid palette entries. |
| Support Light and Dark modes | Either | Either | Explicitly request themes and matching token roles. |
Work with fonts, icons, and saved assets
The two agent preferences do not switch all asset usage on or off. Individual Layers can still contain image widgets and custom fonts. Inline Colors does not prevent an agent from importing an icon or binding an existing font.
PicoPixel distinguishes resources that are already saved in the file from source catalogs that can produce new assets. An empty saved-assets list does not mean the built-in icon catalog is empty. Likewise, a font family available for conversion is different from a generated LVGL font that is ready to use.
This asset-generation demo shows the result of asking PicoPixel LVGL MCP to generate Doto, Playfair, and JetBrains Mono fonts at 12, 18, and 24 px, then add color and outline icons. The samples appear on one screen so you can compare the generated resources in context.
Fonts
The agent should first inspect the generated fonts and reuse one with the requested family and size. If it is missing, it can discover available bundled source families and generate a suitable LVGL font. A custom or uploaded source goes through Assets → Fonts / Create Font in the editor; the agent can then discover and bind the generated result.
Ask for the family, weight or variant, pixel sizes, and any required characters. A 16 px font and a 24 px font are distinct generated assets. Making a label's bounding box larger does not make its glyphs larger.
For example:
Use Roboto Regular at 16 px for body labels and 24 px for the
main reading. Reuse matching generated fonts first. Check
coverage for the actual text, including the degree sign in °C.
If a font needs generating, check the resource budget first,
then bind it to the labels and verify the applied font.
Generating a font does not automatically apply it to a widget. The assistant needs to bind the ready font and verify the final text style. It should tell you if the requested family or characters are unavailable instead of silently substituting another font.
Icons and images
For icons, the agent can search saved image assets first, then search the built-in icon catalog if a suitable saved asset is missing. It can import the chosen icon and bind the resulting saved asset to an LVGL image widget.
Specify the intended symbol, size, and visual treatment: for example, “a 24 px outline sun icon.” If a particular pack or variant matters, name it. Ask for actual icon assets when that is what you want; emoji and text symbols can look different and depend on font coverage.
Importing an icon only adds the resource. The agent must also place or select an image widget and bind the icon to it for the icon to appear on screen. For existing images, it should use the exact saved asset rather than guessing an identifier from its name.
Keep asset usage deliberate
The agent can inspect the project's resource budget before importing icons or converting fonts. Saved Assets and Storage are separate limits from daily MCP calls. Generated font sizes, images, icons, and components can consume saved-asset capacity; saved colors are exempt from that asset count.
Prefer reusing suitable resources to generating duplicate font sizes or importing the same icon repeatedly. If the budget is exhausted, choose an existing resource, remove assets you no longer need through the editor, or review your project's allowance before continuing.
Build your first LVGL screen with AI
Once the connection and preferences are set, try a small, concrete request. Include the display size, content, layout constraints, and resource expectations.
Use PicoPixel LVGL MCP to create a new 480 × 320 screen named
Room Monitor in the active file.

First read the project settings, existing screens, components,
palette, fonts, and resource budget. Follow my Components and
Saved Colors choices.

Create a header, a large temperature reading of 23.5 °C, a
humidity reading of 48%, and a Settings button. Use placeholder
readings. Keep every widget inside the screen and make the text
easy to read at the target display size. Reuse suitable fonts
and assets. Leave existing screens unchanged.

Apply the design, verify that it saved, and read back the result
to check text, font bindings, colors, and layout. Tell me which
resources you reused or created and anything still unfinished.
After the assistant finishes, inspect the screen in PicoPixel. Check alignment, text clipping, spacing, and whether the chosen font is readable at the intended physical size. The values in this example are placeholders; connecting them to sensors or application data is a separate application-development task.
Refine one aspect at a time:
On Room Monitor, make the temperature the strongest visual
element. Reduce the header height and give the readings more
space. Preserve the wording, palette, and other screens.
You can continue editing manually between requests. Before the next change, ask the assistant to reread the affected widgets so it works from the current design.
Write prompts that produce useful edits
The most useful prompts describe both the result and the boundaries of the change. Include these details when they matter:
- Target: name the file, screen, component, or widget you mean.
- Display: give width, height, orientation, and any fixed content area.
- Content: supply exact labels, units, values, and placeholder data.
- Structure: describe the hierarchy and which controls should repeat.
- Resources: name required font families, icon styles, palette roles, or existing components.
- Preservation: say which layout, wording, screens, or resources should stay as they are.
- Completion: ask the assistant to confirm saving and inspect the final affected widgets.
For a targeted edit: “On the Settings screen, align the three rows to the same left edge, give the labels equal widths, and leave their text and colors unchanged.”
For reuse: “Inspect the local library and use the existing navigation component if it matches this screen. Do not create a duplicate with a different name.”
For a proposal: “Read the screen and suggest a clearer hierarchy. Explain your proposed changes before applying any of them.”
A prompt can clarify your intent, but it does not override disabled write access or a disabled component or saved-color policy. Change those controls in PicoPixel when you want to change what is permitted.
Understand the LVGL MCP tools and save workflow
You can use MCP without memorizing tool names, but knowing the main tools helps you understand the assistant's activity and troubleshoot a session.
| Tool | Purpose |
|---|---|
high_level_overview |
Explains the PicoPixel LVGL workflow and authoring rules. |
lvgl_api_info |
Looks up supported reads, operations, resources, geometry rules, and authoring policy. |
lvgl_connection_status |
Reports connection state, the active file, and available access. |
lvgl_read |
Inspects the active document or discovers widgets, fonts, icons, palettes, themes, and budgets. |
lvgl_apply_changes |
Validates, applies, and saves a batch of LVGL changes. |
The normal loop is inspect → apply → read back → review on the canvas. The assistant should read the project preferences before construction and look up exact operations when needed.
Each write call accepts up to 50 operations, subject to request-size and resource limits. It handles revision and request bookkeeping internally. A batch rejected during validation applies nothing; an error during saving or a timeout needs a read-back to determine what happened.
Separate write calls are separate transactions. If the agent creates a screen in one call and fails while adding fonts in the next, the earlier saved screen remains. A long conversation is not one all-or-nothing change. You can review and undo changes in PicoPixel, but an entire task may span several undo steps.
The assistant should check the save result and then inspect the affected widgets. A saved change and a successfully refreshed canvas are related but different outcomes: a render warning does not automatically undo a saved edit.
After a timeout or uncertain save result, have the assistant inspect the document before retrying. Repeating a creation request without checking can duplicate a screen, widget, or resource that was already saved.
For people configuring their own agents
The public interface accepts structured data, not executable JavaScript. lvgl_read takes a query name and optional parameters encoded as a JSON object string. lvgl_apply_changes takes operations encoded as a JSON array string and submits them itself.
Use lvgl_api_info with type="read" or type="operation" to get the current contract. The authoring, resources, and geometry topics explain the corresponding rules. This keeps an agent's instructions aligned with the connected server instead of relying on a copied list of operations from an older release.
Daily calls, project limits, and costs
The hosted service meters lvgl_read and lvgl_apply_changes calls against the authenticated PicoPixel account's daily allowance. One write call counts as one call even when it contains multiple operations. Overview, API documentation, and connection-status tools are unmetered.
The allowance is shared across clients and projects used by that account, and the accounting day resets at 00:00 UTC. Opening another client or project does not create a new allowance. An admitted call can still count if delivery or later processing fails, so a failed design task is not necessarily a zero-call task.
Open Project Settings → AI & MCP to view MCP usage and the reset countdown. The project settings also show Saved Assets and Storage usage. Those resource limits are separate from the daily call meter: having calls left does not guarantee there is room to generate another font asset.
Check the pricing page and the allowance shown in your account for current limits. Your AI provider's own message, token, or subscription usage is separate from PicoPixel's MCP allowance.
To use calls well, give the agent a focused brief, reuse suitable assets, and let it group related supported changes into reasonable batches. Keep the final read-back: verifying the result is part of completing the task.
Troubleshoot your LVGL MCP connection
The client connects, but no project is available
Open the intended LVGL file in a signed-in PicoPixel tab and wait for it to finish loading. A dashboard, account settings page, or closed editor tab does not provide an active design document. Ask the agent to check connection status again and report the active file name.
The assistant can read but cannot create or edit
Check Settings → Integrations → Agent access. Select Guarded write if it is available and you want edits, then confirm that your account has edit permission for the file. Have the assistant recheck write_available before trying another change. Your client may also require tool approval or have the write tool disabled.
PicoPixel reports that MCP is active in another tab
Another editor tab owns the connection. Finish any in-progress operation, close the other connected editor tab, then return to or reopen the intended file. Ask the assistant to confirm the active file again before writing. Repeatedly adding new client connections does not select the correct browser tab.
The URL is rejected or authentication fails
Check which connection method you configured. OAuth connectors use the public /mcp address and a sign-in flow. Manual token connections use the full personal /mcp/stream?userToken=… URL. Confirm the placeholder was replaced, no characters were dropped, and the key has not expired or been revoked.
If you regenerated the key, update manually configured clients with the new URL and reauthorize OAuth connections as needed. Check the access message in Integrations if your account is no longer eligible.
The agent is not using components or saved colors
Open Project Settings → AI & MCP, confirm the selected choices, and ask the agent to reread the preferences. It should inspect the active file's local resources for an exact suitable match. With Use selected, a one-off structure or color may still remain inline when creating a reusable asset would serve no purpose.
If the agent reports policy-disabled, the corresponding setting is disabled. Choose Use yourself if that is your intention, or keep the request within Individual Layers or Inline Colors.
A saved palette change did not recolor existing widgets
Saved-color application through MCP writes a resolved style value. Ask the agent to reapply the intended saved color to the affected widgets. If your goal is to change shared roles across Light and Dark modes, use theme-token bindings instead.
An imported icon or generated font is missing from the screen
Ask the assistant to verify the binding. A saved icon needs an image widget that references it; a generated font needs to be ready and bound to the intended widget's text style. If individual characters are missing, have the assistant check font coverage for the actual text.
A tool reports invalid parameters or an unsupported operation
Ask the assistant to use lvgl_api_info for the exact query or operation and correct the reported fields. Updating or refreshing the client's tool definitions can help if it cached an older server interface. Repeatedly resubmitting the same invalid request will not make it valid.
A call times out, or the assistant is unsure whether the edit saved
Let the current operation finish if it is still running. Ask the assistant to check the active file and read the affected screen or widget before deciding what to retry. Preserve earlier saved progress and apply only what is still missing.
The session limit has been reached
Close unused client sessions and stop repeatedly creating new connections. Follow any retry delay reported by the service, then reconnect. The server reclaims idle sessions; this error is different from exhausting your daily tool-call allowance.
The daily call or asset limit is reached
Check the usage and reset information in AI & MCP. For daily calls, wait for the displayed reset or review the available account allowance. For saved assets or storage, reuse suitable resources or free capacity in the editor before asking the agent to import more.
Disconnect, rotate a key, or stop editing
Use Read only when you want to keep inspection available while preventing further writes. Turn Status off in Integrations to disable the editor's MCP connection without generating a replacement key.
Use Regenerate key when you need a new credential or expiration period. Regeneration immediately invalidates the old key, so update clients that use the personal URL. Existing OAuth clients are affected too and need to reconnect or reauthorize.
Use Revoke key when you want the current key removed. The hosted URL and OAuth clients tied to that key stop working. You can generate another key later.
Removing a server from one AI client's settings removes that client's configured connection. If you want to stop access through other clients using the same PicoPixel key, manage the key in PicoPixel as well.
What happens after the design is ready?
MCP-created content stays in the editor as native screens, widgets, components, and assets. You can inspect it, adjust it by hand, continue refining it with an assistant, and use PicoPixel's LVGL export workflow.
The current MCP authoring interface targets LVGL 8.x. It provides supported design and resource operations; it does not provide arbitrary code execution, LVGL 9 authoring, animation authoring, or a firmware build-and-flash workflow. Use the editor for event wiring and animation work that is not exposed by the current MCP operation list.
Export the UI from PicoPixel when you are ready, then integrate it into your application and validate it on the target device. Sensor data, network requests, business logic, and hardware behavior need their own implementation; a dashboard showing placeholder readings does not connect those readings automatically.
Continue with libraries and reusable components, creating LVGL themes, the event editor, or the ESP32 LVGL tutorial. To try another starting point, open one of the PicoPixel LVGL MCP examples or PicoPixel templates.