Overview
Animated image widget screen पर motion डालने का सबसे simple तरीका है: spinning loader, bouncing icon, blinking eye. यह guide बताती है कि PicoPixel में LVGL animated image widget कैसे काम करता है: उसे कैसे add करें, हर frame same size क्यों होना चाहिए, speed और looping कैसे control करें, और UI running होने पर उसे start/stop कैसे करें.
Animated image widget क्या है?
Animated image still pictures की sequence को एक के बाद एक play करता है, flipbook की तरह. हर picture एक frame है, और उन्हें तेजी से flip करने पर movement का illusion बनता है. आप frames का set देते हैं, speed और loop बताते हैं, और बाकी काम widget करता है.
यह single repeating animation के लिए perfect है: loading spinner, pulsing heart, waving hand. One widget, one sequence, loop पर play होती हुई.
Under the hood यह LVGL का lv_animimg widget है. Project export करते समय PicoPixel आपके लिए LVGL code लिखता है (lv_animimg_create, lv_animimg_set_src, lv_animimg_set_duration, and so on), आपको उसे touch नहीं करना पड़ता. यह LVGL 8.x target करता है.
Animated image vs. sprite - कौन use करूं?
ये दो widgets similar दिखते हैं लेकिन different problems solve करते हैं:
- Animated image, one animation जो loop करती है. जब graphic सिर्फ एक चीज करती है, जैसे spinner spin करना, तो इसे use करें.
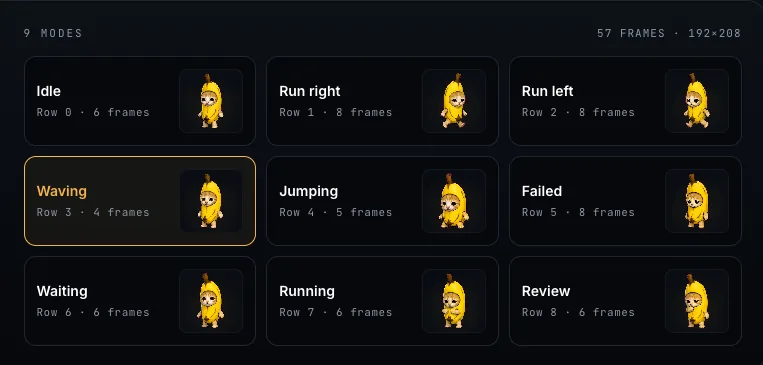
- Sprite, एक widget में several animations, जिनके बीच switch कर सकते हैं (Idle, Running, Happy…). जब graphic को एक से ज्यादा mode चाहिए, तो sprite use करें.
असल में sprite animated images से बना होता है; उसके हर mode के नीचे अपना animated image होता है. इसलिए अगर आपको दूसरी animation पर toggle करना है, तो sprite बेहतर choice है.
Animated image add करना और frames upload करना
- अपनी screen में Animated Image widget add करें.
- Properties में Image Set row ढूंढें और Add Image Set क्लिक करें.
- NEW tab पर upload area ("Click to upload frames") क्लिक करें और images select करें. कई images एक साथ चुन सकते हैं; formats PNG and JPEG (
.png,.jpeg,.jpg) हैं. - Frames widget से attach करने के लिए Continue क्लिक करें. Image Set row अब frame count दिखाएगी, जैसे "8 frames".
पहले use किया हुआ frame set दोबारा upload करने के बजाय Assets tab से भी ले सकते हैं.
Frames filename के alphabetic order में ordered होते हैं, इसलिए उन्हें leading zeros के साथ sequence में name करें, frame_01.png, frame_02.png, frame_03.png, ताकि सही order guaranteed रहे. frame_2.png जैसा नाम frame_10.png के बाद sort होगा, जिससे animation बिगड़ सकती है.
Animated image को कम से कम 2 frames चाहिए, और आप 32 तक add कर सकते हैं. उससे ज्यादा motion चाहिए तो fewer, well-chosen keyframes consider करें; हर frame device पर stored होती है.
सभी frames same size क्यों होने चाहिए
याद रखने वाली सबसे important rule: हर frame की exact same width और height होनी चाहिए. Different sizes की frames add करने पर PicoPixel message देगा "All frames must have the same dimensions."
Reason simple है. Widget हर frame को same spot और same box में draw करता है. अगर frame 1 64×64 है और frame 2 80×80, तो picture smooth animate होने के बजाय jump और shift करेगी. हर frame identical size होने से motion clean दिखता है.
Upload से पहले frames resize करें. Clean sequence पाने का quickest तरीका है कि image tool में same canvas से हर frame export करें, ताकि dimensions guaranteed same हों.
Speed set करना: duration
Duration setting animation की speed control करती है. यह milliseconds (ms) में measured होती है और सभी frames से गुजरने के one full pass का time बताती है, per-frame time नहीं. Default 1000 ms है (one second).
PicoPixel duration को frames में evenly split करता है. 8 frames पर 1000 ms duration का मतलब हर frame 125 ms दिखेगी. Faster चाहिए? Duration घटाएं. Slower और relaxed चाहिए? बढ़ाएं.
Looping: एक बार या हमेशा
Repeat setting तय करती है कि animation end पर क्या होगा. दो choices हैं:
- Infinite, animation forever loop करती है. यह default है, और spinner जैसी चीजों के लिए सही है जिन्हें stop नहीं होना चाहिए.
- Normal (a count), animation set number of times play होकर stop होती है. इसे 3 set करें और वह तीन बार चलेगी, फिर last frame पर रहेगी.
UI चलने के दौरान playback control करना
Animation को automatically run होने देना जरूरी नहीं: आप event editor से user action के response में start और stop कर सकते हैं. Event add करें, Animated Image Mode action चुनें, अपनी animated image target करें, और mode चुनें:
- Start, playing शुरू या resume करें.
- Stop, animation pause करें.
- Restart, first frame पर लौटकर फिर play करें.
Example: "connecting…" spinner को button press होने तक stopped रखें, फिर Start करें, और task finish होने पर Stop करें.
Memory हल्की रखना
Animations images हैं, और images small device पर space लेती हैं. कुछ habits चीजों को efficient रखती हैं:
- सिर्फ जरूरी frames use करें. Smooth motion को अक्सर कुछ well-chosen frames से ही काम चल जाता है.
- Frame dimensions modest रखें. 64×64 animation 240×240 से बहुत हल्की है.
- Color depth display से match करें (real hardware build करने पर ज्यादा के लिए ESP32 tutorial देखें).
Firmware export करते समय animated image को lv_conf.h में LV_USE_ANIMIMG enabled चाहिए. PicoPixel exported README.md में यह note करता है, ताकि build (या AI assistant) ठीक-ठीक जान सके कि क्या on करना है.
Next steps
- Single widget में एक से ज्यादा animation चाहिए? sprite widget पर जाएं.
- Animation को button या दूसरे trigger से event editor में wire करें.
- Finished UI को device पर ले जाने के लिए ESP32 LVGL tutorial देखें.