ओवरव्यू
क्या आप real keyframe control वाला मुफ्त LVGL animation template ढूंढ रहे हैं? यह PicoPixel project 480 x 480 embedded UI canvas पर position, size, opacity और mixed tracks के लिए timeline-based widget animations दिखाता है।
ये केवल static motion mockups या frame-by-frame image sequences नहीं हैं। Template granular, keyframe-style animations दिखाता है, जहाँ individual properties time के साथ control होती हैं। Timeline view में आप X/Y position, W/H size और opacity के लिए अलग tracks देख सकते हैं, और timeline पर रखे keyframes के कारण हर property अपने moment पर बदल सकती है।
इसे ESP32 dashboards, onboarding screens, loading states, attention cues, confirmation feedback, smart-device interfaces, kiosk panels, या किसी भी LVGL UI के starting point की तरह इस्तेमाल करें जहाँ button दबाने के बाद widget को move, resize, fade, या कई animated properties combine करनी हों।
क्या शामिल है
- चार 480 x 480 animation examples, जिन्हें Position, Size, Opacity और Mixed boards के रूप में layout किया गया है।
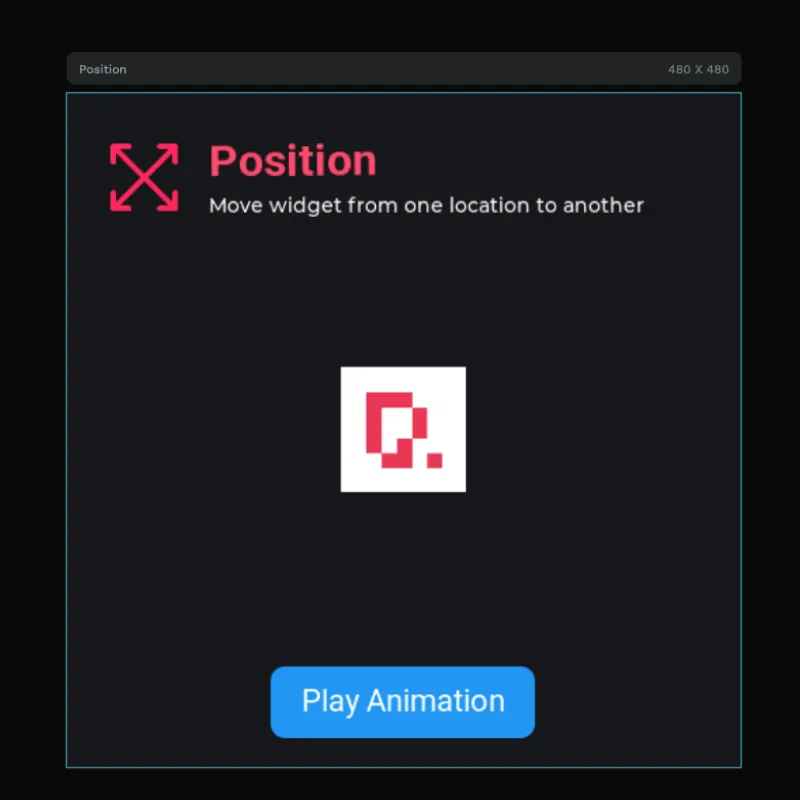
- Position animation, जो keyed X/Y changes के साथ widget को एक जगह से दूसरी जगह move करता है।
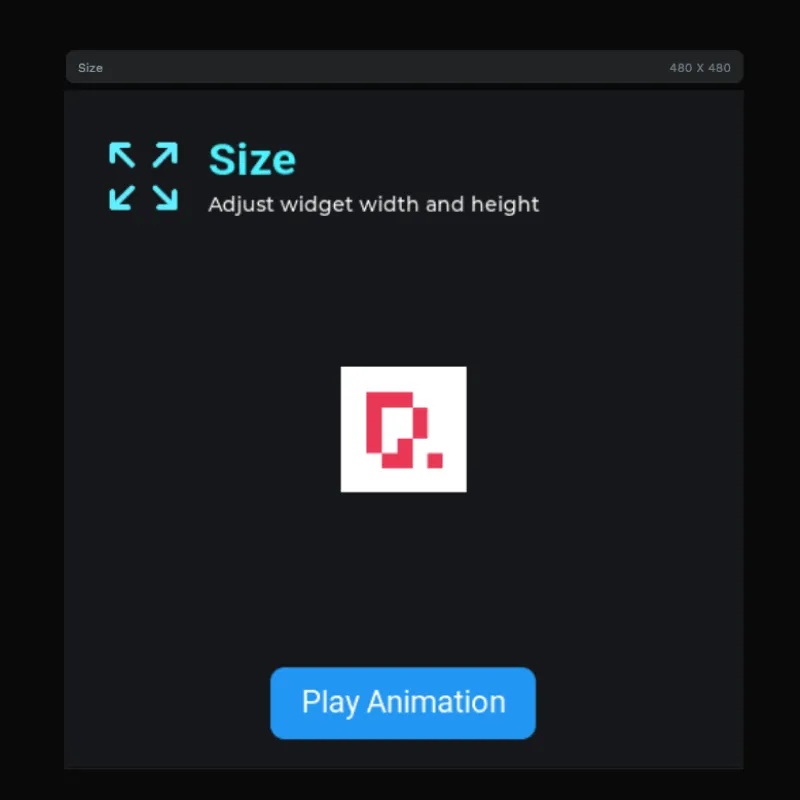
- Size animation, जो keyed W/H changes के साथ widget width और height adjust करता है।
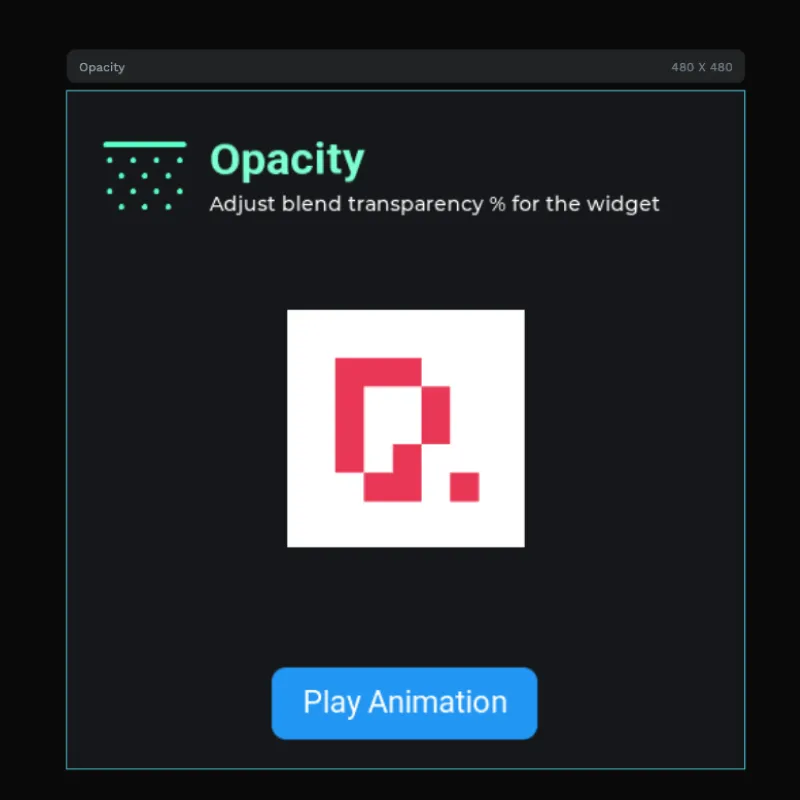
- Opacity animation, जो fade-style effects के लिए blend transparency को time के साथ बदलता है।
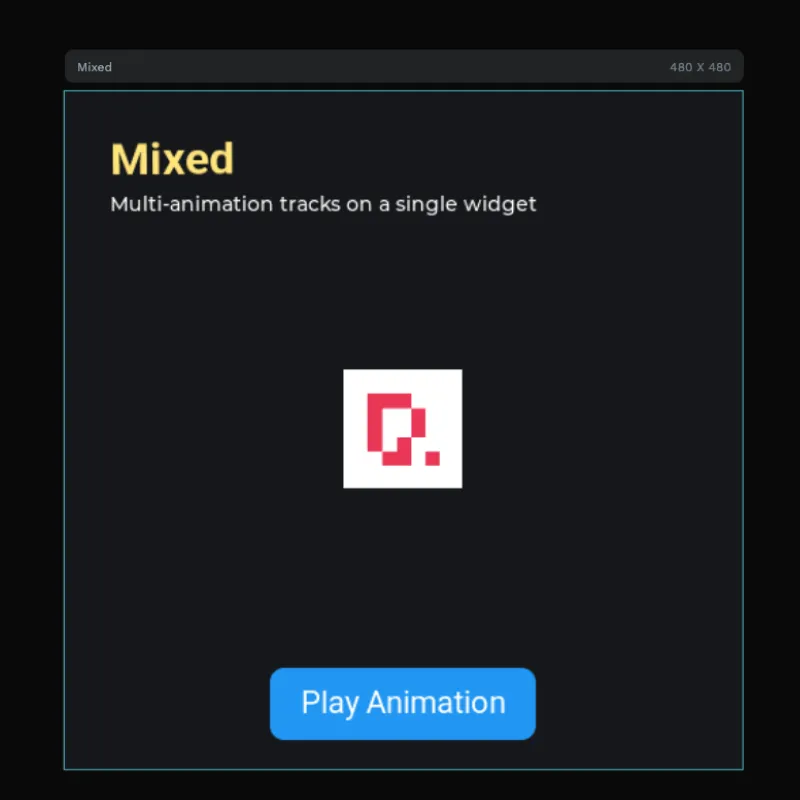
- Mixed animation, जो single widget पर कई animation tracks combine करता है।
- Play Animation buttons, हर example के लिए एक, ताकि हर timeline UI से trigger हो सके।
- Timeline/keyframe editor preview, जो tracks और keyframes के साथ actual animation mode दिखाता है।
- PicoPixel logo target, जिसे हर example में animated widget की तरह इस्तेमाल किया गया है।
- Reusable visual icons, जिनमें position, size, opacity और mixed animation graphics शामिल हैं।
- Roboto font assets, जिन्हें card headings, captions और buttons के लिए इस्तेमाल किया गया है।
एसेट झलक
Assets panel इसे compact LVGL animation reference की तरह दिखाता है:
- Images:
5, जिनमें PicoPixel logo, logotype और छोटे animation concept icons शामिल हैं। - Colors:
0, colors design में direct apply किए गए हैं। - Fonts:
2,Roboto 22औरRoboto Bold 32। - Widgets:
0, जिससे example screen objects, events और animation timelines पर focused रहता है।
Visible image assets में शामिल हैं:
-
96x96position/resize-style cyan icon. -
96x96opacity-style cyan dotted icon. -
250x250PicoPixel logo image. -
356x100PicoPixel logotype image. -
96x96pink mixed/position-style icon.
यह asset set जानबूझकर छोटा रखा गया है। Motion large image frames की sequence store करने से नहीं, बल्कि keyframed LVGL object properties से आता है।
लेयर संरचना
Layer panel project को animation type के अनुसार group करता है:
-
Position, जिसमेंPlay Pos Animation,Pico Logo,Image 1और labels हैं। -
Size, जिसमेंPlay Size Animation,Pico Logo,Image 3और labels हैं। -
Opacity, जिसमेंPlay Opacity Animation,Pico Logo,Image 4और labels हैं। -
Mixed, जिसमेंPlay Mixed Animation,Pico Logoऔर labels हैं।
हर board वही teaching pattern follow करता है: title और description animation type समझाते हैं, PicoPixel logo animated target की तरह काम करता है, और blue button playback trigger करता है।
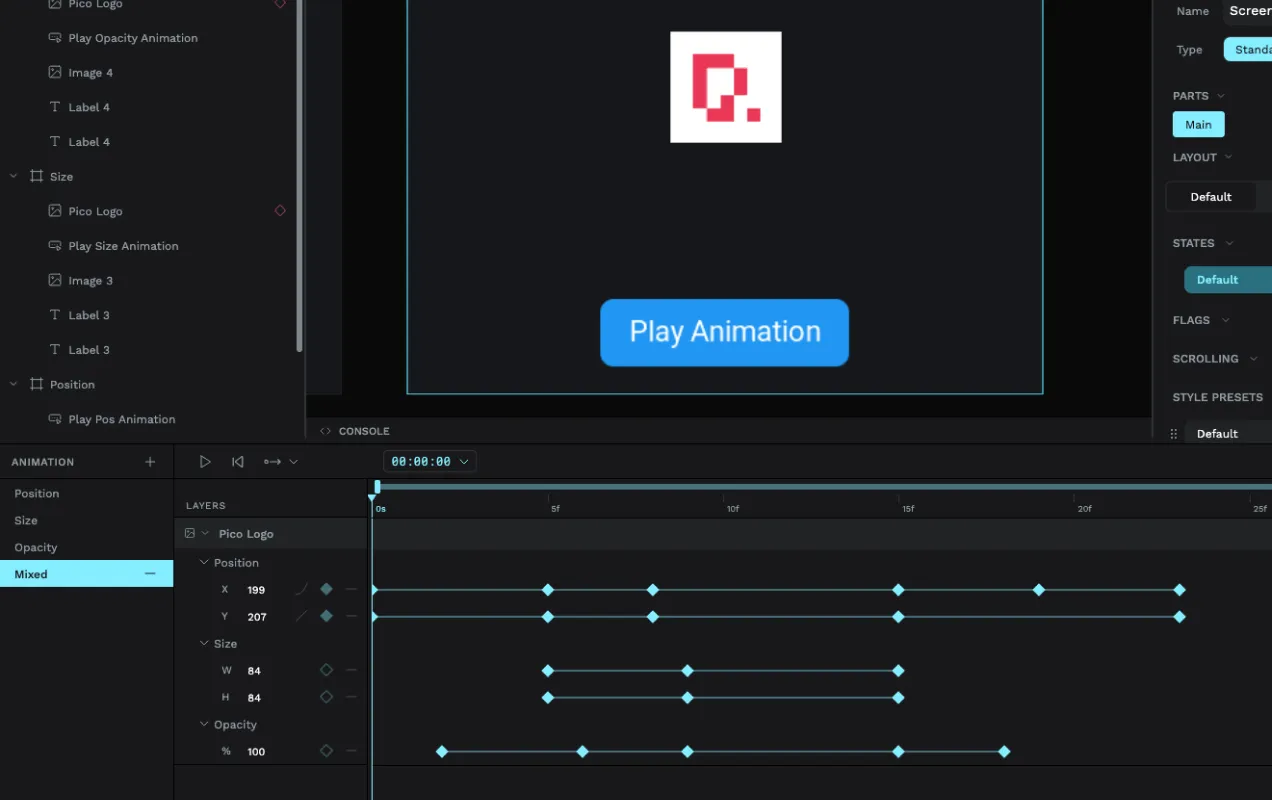
टाइमलाइन और कीफ्रेम
इस template की मुख्य बात यह है कि animations timeline-controlled हैं। Animation editor preview में left side पर Position, Size, Opacity और Mixed जैसे animation types listed हैं। फिर timeline selected animated widget को property tracks में expand करती है।
Mixed example के लिए screenshot दिखाता है:
- Position tracks, जिनमें अलग
XऔरYvalues हैं। - Size tracks, जिनमें अलग
WऔरHvalues हैं। - Opacity track, जिसमें
%value है। - Multiple keyframes, जिन्हें time के अलग points पर रखा गया है।
- Timeline scrubbing, ताकि आप precise timestamp पर animation inspect कर सकें।
यही चीज इस example को simple transition से ज्यादा powerful बनाती है। आप exact times पर exact values set करके widget choreograph कर सकते हैं, फिर export से पहले result preview कर सकते हैं।
Export करने से पहले PicoPixel में important objects को rename करें, जैसे btn_play_position, btn_play_size, btn_play_opacity, btn_play_mixed, animated_logo और animation_card। Clear names generated LVGL animation और event code को follow करना बहुत आसान बनाते हैं।
टाइमलाइन एनिमेशन बनाम फ्रेम एनिमेशन
यह template keyframed widget animations के बारे में है: LVGL objects को time के साथ move, resize और fade करना। यह frame-based animated image से अलग है, जहाँ हर frame एक separate bitmap होता है।
- इस template का इस्तेमाल तब करें जब आप LVGL object की properties animate करना चाहते हैं, जैसे position, width, height या opacity।
- LVGL animated image तब इस्तेमाल करें जब आपके पास spinner, sprite-like loader या illustrated loop जैसी pre-rendered frame sequence हो।
- event editor तब इस्तेमाल करें जब आप button, screen load, gesture या दूसरे trigger से इनमें से किसी animation को play करना चाहते हों।
दोनों approaches useful हो सकते हैं। UI motion और transitions के लिए keyframes आम तौर पर बेहतर होते हैं क्योंकि वे object को editable रखते हैं और कई image frames store करने से बचा सकते हैं।
यह LVGL के लिए क्यों अच्छा है
LVGL time के साथ object properties update करने में अच्छा है, और PicoPixel का animation mode उन values को hand-written C में छिपाने के बजाय visible बनाता है।
- Position keyframes object coordinates से map होते हैं, जो panels, icons, cards और notification movement के लिए useful है।
- Size keyframes width और height से map होते हैं, जो expanding controls, pulse effects, progress emphasis और focus states के लिए useful है।
- Opacity keyframes blend transparency से map होते हैं, जो fades, disabled states, reveals और attention cues के लिए useful है।
- Mixed tracks कई properties combine करते हैं, ताकि एक widget single timeline की तरह move, resize और fade कर सके।
- Events animations trigger कर सकते हैं, इसलिए button click live preview और exported LVGL project में timeline चला सकता है।
- Project standard LVGL 8.x UI code के रूप में export होता है, इसलिए इसे ESP-IDF, Arduino, PlatformIO, STM32, Zephyr या किसी दूसरे LVGL build में integrate किया जा सकता है।
रनटाइम पैटर्न
PicoPixel आपके लिए animation setup और play actions generate कर सकता है। अगर आपको exported project को हाथ से extend करना हो, तो वही concept normal LVGL animation code में map होता है: animation initialize करें, target object चुनें, values और timing set करें, और उसे start करें।
static void set_opa(void * obj, int32_t value)
{
    lv_obj_set_style_opa((lv_obj_t *)obj, (lv_opa_t)value, 0);
}

static void fade_logo(lv_obj_t * logo)
{
    lv_anim_t a;
    lv_anim_init(&a);
    lv_anim_set_var(&a, logo);
    lv_anim_set_values(&a, LV_OPA_COVER, LV_OPA_30);
    lv_anim_set_time(&a, 450);
    lv_anim_set_exec_cb(&a, set_opa);
    lv_anim_start(&a);
}
ज्यादातर template users के लिए visual timeline आसान रास्ता है: PicoPixel में keyframes बनाएं, Play Animation event action के साथ button connect करें, फिर export करें।
Flash करने से पहले सभी animations को live preview करने के लिए project को PicoPixel में खोलें। Preview mode के लिए hardware जरूरी नहीं है।
कस्टमाइज़ करना
इसे मुफ्त LVGL keyframe animation template की तरह इस्तेमाल करें, फिर timelines को अपनी UI के अनुसार adapt करें।
- PicoPixel logo को अपने icon, status tile, card, modal या indicator से replace करें।
- Panel slide करने, notification move करने या control पर attention guide करने के लिए position keyframes बदलें।
- Pulse, button feedback, expanding card या focus state बनाने के लिए size keyframes बदलें।
- Content को fade in या fade out करने के लिए opacity keyframes बदलें।
- Richer UI motion के लिए mixed example में position, size और opacity combine करें।
- Timing adjust करें ताकि animation embedded interactions के लिए sufficiently quick लगे।
- सही moment पर animations चलाने के लिए
ClickedयाScreen Loadedजैसे events इस्तेमाल करें। - Memory-limited boards पर flash करने से पहले image sizes modest रखें और unused assets remove करें।
अपने प्रोजेक्ट में एक्सपोर्ट करना
Template को PicoPixel में खोलें, animation timeline inspect करें, important objects rename करें, और हर board को उसके Play Animation button से preview करें। फिर project को LVGL C code के रूप में export करें।
ESP32 projects के लिए usual flow है:
- उस board को चुनें जो आपके motion से match करता हो: Position, Size, Opacity या Mixed।
- Logo और labels को अपने UI objects से replace करें।
- Animation timeline में keyframes, timing और easing adjust करें।
- Trigger को Play Animation action से connect करने के लिए event editor इस्तेमाल करें।
- PicoPixel UI को LVGL C के रूप में export करें।
- Exported files को अपने ESP-IDF, Arduino या PlatformIO project में add करें।
- LVGL और display driver ready होने के बाद
ui_init()call करें।
ज्यादा background के लिए event editor guide और using PicoPixel templates guide पढ़ें।
सबसे अच्छे उपयोग
यह template तब अच्छा fit है जब आप इनके लिए clear starting point चाहते हैं:
- LVGL keyframe animation examples
- ESP32 UI motion prototypes
- Timeline-controlled widget motion
- Button-triggered animation playback
- Position, size और opacity animation testing
- Loading states और progress feedback
- Confirmation और attention cues
- Onboarding screens और interactive demos
- यह सीखना कि PicoPixel visual timelines कैसे LVGL behavior बनती हैं