Overview
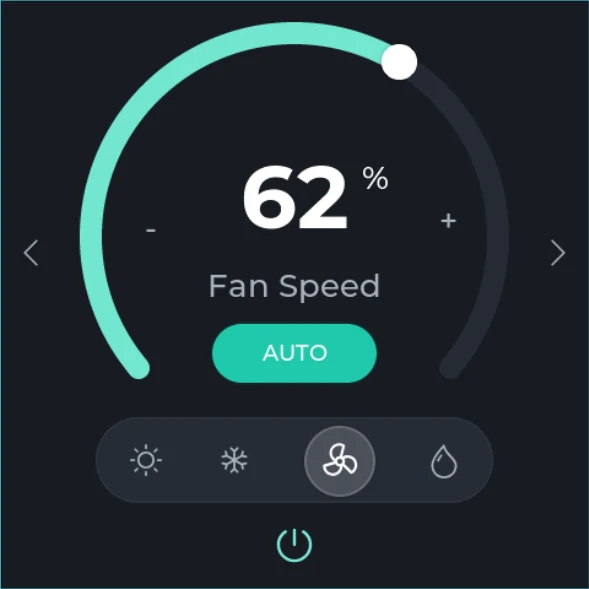
ESPHome Temp UI is a free LVGL fan-speed control template for a 480 x 480 square display. Despite the broad project name, the included screen is specifically organized around fan speed: a large arc shows the current percentage, an AUTO button communicates the control mode, and a compact selector provides heat, cool, fan, and dry options.
The sample state displays 62% with fan mode selected. Previous and next arrows sit at the sides of the dial, a minus and plus flank the center value, and a power icon is kept separate at the bottom. The result is a focused interface that can work as an ESPHome climate panel, ESP32 fan controller, air-quality appliance control, or smart-home display concept.
This is a static visual template. It does not include ESPHome YAML, entity bindings, fan control logic, climate calls, configured events, or animations. Those behaviors must be connected after export.
What's included
- One 480 x 480 LVGL screen, designed for a square embedded panel.
- Large fan-speed arc, with a mint progress section and white position handle.
- Fan-speed percentage, shown as
62%in the sample state. - Minus and plus controls, positioned beside the main value.
- Previous and next arrows, available for moving through modes or settings.
- AUTO control, presented as a prominent rounded button.
- Four-mode selector, covering heat, cool, fan, and dry concepts.
- Selected fan state, using a raised circular highlight around the fan icon.
- Dedicated power control, centered beneath the mode selector.
- Seven imported icon assets for modes, navigation, and power.
- Three converted Montserrat font assets for the value and supporting text.
The project has no local images, animated images, colors, or reusable components. Its visual system is built from the arc, labels, containers, button, and small icon assets.
Fan-speed layout
The 350 x 350 arc dominates the upper portion of the screen. Its mint progress color stands out against the dark charcoal background, while the unfilled track remains visible without competing with the current value. A white handle marks the end of the active section and reinforces the idea that the setting can change.
The central reading uses a large 62, a smaller percent sign, and the caption Fan Speed. Separating the percent sign lets the numeric value remain the main focal point. The small minus and plus symbols are close enough to feel related to the setting while staying outside the large type.
The AUTO button sits directly below the caption, giving the active control behavior more emphasis than the individual climate modes. Previous and next arrows appear at the far edges of the dial, where they can be adapted for navigating fan presets, screens, or device zones.
The lower selector uses four recognizable modes:
- Heat
- Cool
- Fan
- Dry
Fan is selected in the preview with a circular gray highlight. The power symbol sits below the selector rather than inside it, reducing the chance that an on/off action is mistaken for another operating mode.
Asset snapshot
The local library contains:
- Images:
0. - Animated images:
0. - Icons:
7. - Colors:
0, with colors applied directly to the objects. - Fonts:
3. - Components:
0.
The icon assets are sized for the finished interface:
Heat Mode Icon— 28 x 28Cool Mode Icon— 28 x 28Fan Mode Icon— 34 x 34Dry Mode Icon— 28 x 28Previous Icon— 26 x 26Next Icon— 26 x 26Power Icon— 38 x 38
The three font assets are:
Fan UI Montserrat Medium 18 500Fan UI Montserrat Medium 26 500Fan UI Montserrat Bold 72 700
This small typography set covers the AUTO label, fan-speed caption, percentage sign, and large central value without importing unnecessary sizes.
Editable LVGL structure
The screen uses named LVGL-friendly objects including Fan Speed Arc, Fan Speed Value, Percent Label, Fan Speed Caption, Auto Fan Button, Mode Selector Bar, Selected Fan Mode, and Power Control. The previous and next arrows and all four mode symbols are separate image objects.
This makes the design easier to adapt than a flattened dashboard image. Firmware can update the arc and number independently, change the selected-mode highlight, replace the AUTO label, or hide unsupported modes without recreating the entire screen.
The plus and minus marks are currently label objects, while AUTO is a button object. None of the visible controls have configured event wiring in the supplied project. If they need to be interactive, connect them to callbacks after export or replace them with the input objects that best match your touch, encoder, or keypad workflow.
Why this works well for LVGL and ESPHome
The layout is based on a small group of standard interface primitives:
- The arc provides a clear fan-speed scale without requiring a dial bitmap.
- Labels keep the percentage and mode editable from application code.
- The selector container groups related climate states into one compact control.
- Separate icons allow explicit state styling for heat, cool, fan, and dry.
- A dedicated button can represent automatic control, schedules, or another high-level mode.
- The square canvas provides a predictable target for 480 x 480 touch panels.
An ESPHome integration can use a fan or climate entity as the source of truth, then reflect the confirmed state on the LVGL screen. The precise YAML and actions depend on the connected equipment and ESPHome configuration; this project supplies the visual layer only.
Connecting live fan data
After export, update the percentage label and arc from a normalized value. The selected icon and AUTO button should reflect the state reported by the device rather than only the last user tap.
A simplified LVGL update could look like this:
static void fan_ui_set_speed(int percent, bool automatic)
{
    if (percent < 0) percent = 0;
    if (percent > 100) percent = 100;

    lv_arc_set_value(ui_fan_speed_arc, percent);
    lv_label_set_text_fmt(ui_fan_speed_value, "%d", percent);
    lv_obj_add_state(ui_auto_fan_button,
                     automatic ? LV_STATE_CHECKED : LV_STATE_DEFAULT);
}
This example is illustrative only. A production implementation still needs input debouncing, value validation, synchronization with the real fan or climate entity, unavailable states, and appropriate equipment safeguards. Do not place compressor timing, motor protection, or other safety behavior in generated display code.
Customizing the template
- Replace the fan-speed percentage with the actual range supported by your fan entity.
- Map the minus and plus controls to fixed steps such as 5%, 10%, or named presets.
- Use previous and next for pages, zones, devices, or preset selection.
- Rename AUTO to
Auto,Smart,Schedule, or another verified operating state. - Remove heat, cool, or dry icons when the connected equipment does not support those modes.
- Add an unavailable state that dims the arc and replaces the percentage with a clear status.
- Change the mint accent to match your enclosure, brand, or active climate mode.
- Adjust the dial size and touch targets for the physical dimensions of the panel.
- Rename the important objects before export so the generated references match your firmware conventions.
- Add current temperature, humidity, air quality, or timer information only if the primary fan control remains easy to read.
Exporting to your project
Open the template in PicoPixel, replace the sample state, and confirm that the 480 x 480 screen matches your target panel. Then export the UI, icons, and fonts as LVGL C and connect the named objects to your application or ESPHome state.
A typical workflow is:
- Open the template in PicoPixel or download the
.picopixelproject. - Define the real speed range, supported modes, presets, and power behavior.
- Rename the arc, labels, button, selector, and icons.
- Add loading, unavailable, disconnected, and pending states.
- Wire the desired controls to LVGL callbacks or ESPHome actions.
- Export the UI and integrate it with your ESPHome, ESP-IDF, Arduino, PlatformIO, or other LVGL application.
- Reconcile requested changes with confirmed device state.
- Verify the controls and text on the physical display.
For the editor import flow, see How to use PicoPixel templates. For a broader embedded display workflow, read the ESP32 LVGL UI tutorial.
Best uses
This template is a useful starting point for:
- ESPHome fan-control displays
- ESP32 climate panels
- Air purifier and ventilation controls
- HVAC fan-speed interfaces
- Square 480 x 480 touch displays
- LVGL arc and percentage examples
- Heat, cool, fan, and dry selectors
- Automatic fan mode prototypes
- Smart-home appliance dashboards
- Compact device-control interfaces
The design is strongest when a single adjustable percentage needs to remain the focus while a small set of related climate modes stays immediately accessible.