ओवरव्यू
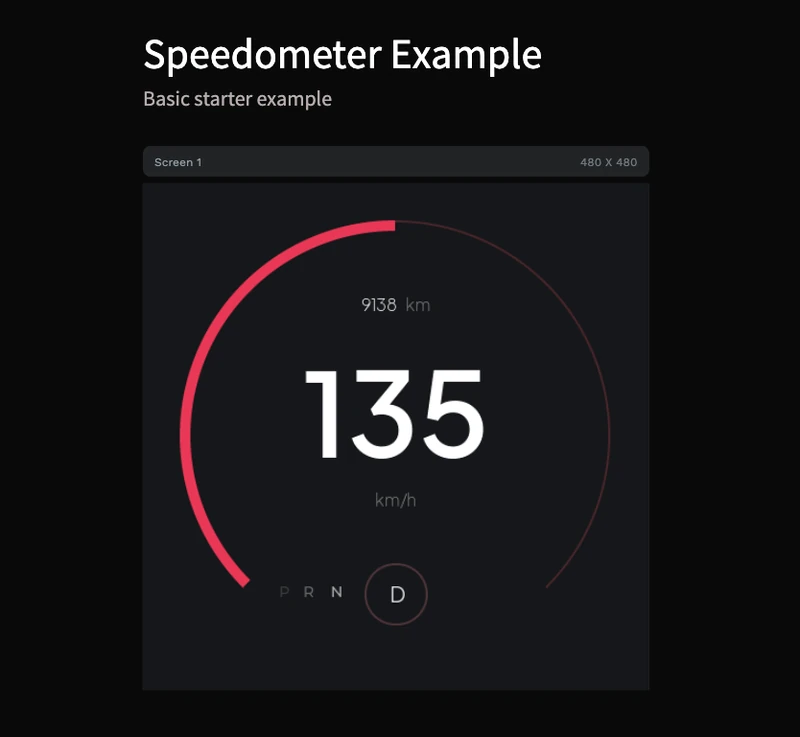
क्या आप मुफ्त LVGL speedometer example ढूंढ रहे हैं? यह PicoPixel template आपको ready-to-open 480 x 480 dashboard gauge देता है, जो standard LVGL-friendly pieces से बना है: arc-based speed ring, large numeric speed readout, odometer text, unit label और compact PRND drive-state labels।
Project जानबूझकर simple और modify करने में आसान है। इसे ESP32 vehicle dashboard, e-bike display, scooter cluster, RC controller, simulator panel, industrial motor gauge, या किसी भी embedded UI के starter की तरह इस्तेमाल करें जहाँ live value को real instrument जैसा feel होना चाहिए।
क्योंकि design baked image के बजाय labels, containers, fonts और LVGL arc से बना है, यह clean LVGL C code export करने और values को अपने sensor, CAN bus, GPS, motor controller या demo data source से wire करने के लिए practical base है।
क्या शामिल है
- 480 x 480 dashboard screen, square canvases के लिए sized और round displays में adapt करना आसान।
- LVGL arc gauge, main speed ring के रूप में arc widget use करता है ताकि indicator code से update हो सके।
- Large numeric speed label, preview में
135के रूप में shown, strong instrument-cluster focal point के लिए। - Unit label, currently
km/h, जिसेmph,%,RPM,Wया किसी भी measurement में बदलने के लिए ready। - Odometer group,
9138 kmके रूप में shown, mileage, trip distance, runtime, battery range या किसी दूसरे secondary metric के लिए useful। - PRND drive labels, जिनमें
Dcircular state indicator में highlighted है। - Dark embedded-dashboard styling, high contrast white typography और red/pink gauge accent के साथ।
- No image dependency, इसलिए UI lightweight और LVGL objects की तरह editable रहती है।
- Three bundled font styles, screenshot की Plus Jakarta Sans text hierarchy से match करते हुए।
- One reusable widget asset, template की local library में visible, जिसे दूसरे PicoPixel projects में quick reuse किया जा सकता है।
एसेट झलक
Template deliberately lean है। Assets panel में local library दिखाती है:
- Images:
0, gauge static screenshot नहीं है। - Colors:
0, current palette design में directly apply है। - Fonts:
3, multiple sizes पर Plus Jakarta Sans use करते हुए। - Widgets:
1, reusable speedometer widget preview जिसे दूसरे project में drop किया जा सकता है।
Bundled font set gauge की visual hierarchy के लिए sized है:
-
PlusJakartaSans ExtraLight 16, odometer suffix जैसे small secondary text के लिए। -
PlusJakartaSans Light 20,km/hऔर drive-state text जैसे supporting labels के लिए। -
PlusJakartaSans SemiBold 110, large center speed value के लिए।
इसका मतलब LVGL export editable primitives पर focused रह सकता है: labels, containers, arc और fonts, बिना unnecessary image assets carry किए।
LVGL-केंद्रित संरचना
Screenshot bitmap-heavy mockup के बजाय small, export-friendly hierarchy दिखाता है। Design one screen, grouping के लिए containers, several labels, odometer group और main arc के around बनाया गया है।
-
Screen 1480 x 480 canvas है। - Root container gauge layout hold करता है और dashboard centered रखता है।
- Odometer text grouped है ताकि number और
kmsuffix साथ move कर सकें। - Center speed value large label है, जिससे runtime updates
lv_label_set_textयाlv_label_set_text_fmtसे straightforward होते हैं। - Main gauge LVGL arc है, इसलिए same visual को
lv_arc_set_valueसे drive किया जा सकता है। - PRND row labels से बना है, active drive state को small circular container से emphasize किया गया है।
LVGL speedometer template के लिए यही structure चाहिए: dial editable है, text live है, और exported code normal LVGL patterns के करीब रह सकता है।
Export करने से पहले PicoPixel में important objects rename करें, जैसे speed_arc, speed_value_label, unit_label, odo_label और drive_state_label। Clear names generated LVGL C को firmware से update करना बहुत आसान बनाते हैं।
यह LVGL के लिए क्यों अच्छा है
यह example pretty screenshot से ज्यादा useful है। इसे उन चीजों के around design किया गया है जिन्हें LVGL embedded hardware पर अच्छी तरह render करता है।
- Arc rendering LVGL में native है, इसलिए speed ring के लिए large transparent image जरूरी नहीं है।
- Labels update करना cheap है, जो changing speed, distance, battery range या mode text के लिए ideal है।
- Visual state explicit है, इसलिए आपका firmware arc value, center label, odometer और drive selection independently update कर सकता है।
- Design compact है, imported image assets नहीं हैं और dashboard look के लिए केवल needed fonts हैं।
- यह standard LVGL 8.x UI code के रूप में export होता है, इसलिए आप इसे ESP-IDF, Arduino, PlatformIO, STM32, Zephyr या किसी दूसरे LVGL project में integrate कर सकते हैं।
कस्टमाइज़ेशन विचार
इसे मुफ्त LVGL gauge starting point की तरह इस्तेमाल करें, फिर अपने product या demo के लिए details tune करें।
- Speed range को road-speed scale से
0-100,0-240,0-8000 RPM, battery percentage, throttle position या temperature में बदलें। - Display shape से match करने के लिए arc thickness, start angle, end angle और color adjust करें।
- Red/pink accent को brand colors, warning colors या range-based colors से swap करें।
-
km/hकोmph,RPM,%,W,V,A,CयाFसे replace करें। - Odometer row को trip distance, uptime, remaining range, lap count या total energy के लिए use करें।
- PRND को
ECO,SPORT,PARK,AUTOयाMANUALजैसे custom modes से replace करें। - Small icons, battery bar, warning indicators, turn-signal states या RPM के लिए second arc add करें।
- Label instantly jump कराने के बजाय LVGL timer या animation callback से value changes animate करें।
लाइव डेटा जोड़ना
PicoPixel से export करने के बाद, generated UI files को अपने project में रखें और named objects को firmware loop, event handler या LVGL timer से update करें। Exact object names export से पहले widgets को दिए गए names पर depend करते हैं, लेकिन runtime pattern ऐसा दिखता है:
static void dashboard_set_speed(int speed_kph, uint32_t odometer_km)
{
    lv_arc_set_value(ui_speed_arc, speed_kph);
    lv_label_set_text_fmt(ui_speed_value_label, "%d", speed_kph);
    lv_label_set_text_fmt(ui_odo_label, "%lu km", (unsigned long)odometer_km);
}
अगर आपकी speed GPS, CAN, UART, BLE, motor controller या simulated data से आती है, तो hardware-specific parsing को UI code के बाहर रखें। UI function को clean values receive करने दें और केवल LVGL updates handle करने दें।
अपने प्रोजेक्ट में एक्सपोर्ट करना
Template को PicoPixel में खोलें, जरूरत हो तो display size adjust करें, key widgets rename करें, फिर project को LVGL C code के रूप में export करें। Generated files को किसी भी दूसरे LVGL UI की तरह existing embedded project में add किया जा सकता है।
ESP32 projects के लिए usual flow है:
- अपने display और touch/input drivers configure करें।
- PicoPixel UI को LVGL C के रूप में export करें।
- Exported files को अपने ESP-IDF, Arduino या PlatformIO project में add करें।
- LVGL और display driver ready होने के बाद
ui_init()call करें। - अपने telemetry loop, event queue या
lv_timerसे speedometer values update करें।
Broader walkthrough के लिए ESP32 LVGL UI tutorial और using PicoPixel templates guide देखें।
सबसे अच्छे उपयोग
यह template तब fast visual starting point है जब आपको चाहिए:
- LVGL speedometer demos
- ESP32 dashboard prototypes
- Round-display vehicle clusters
- E-bike, scooter, go-kart या RC telemetry screens
- Industrial gauge panels
- Simulator dashboards
- Motor speed या RPM displays
- Battery range और drive-mode interfaces
यह सीखने के लिए भी अच्छा file है कि ज्यादा complex instrument cluster बनाने से पहले normal widgets से LVGL gauge कैसे बनाया जा सकता है।